
Programming a garage door opener involves locating the learn button, pressing it to activate programming mode, then pressing your remote button within 30 seconds until the opener lights flash or you hear two clicks.
Hey there, garage door friends! If you’ve ever found yourself standing in your driveway, frantically pressing a garage door remote that just won’t work, you know exactly how frustrating it can be. Whether you’ve just moved into a new home, replaced a broken remote, or your garage door opener has mysteriously “forgotten” your remote, learning how to program your garage door opener is one of the most valuable DIY skills every homeowner should master.
After years of helping homeowners troubleshoot their garage door dilemmas and creating digital content for reputable garage door repair companies, I can tell you that programming issues are among the most common problems people face [1]. The good news? Programming your garage door opener is actually much simpler than most people think, and with the right guidance, you can have your system up and running in just a few minutes.
In this comprehensive guide, I’ll walk you through everything you need to know about programming garage door openers, from the basic concepts to step-by-step instructions for all major brands. Whether you’re dealing with a LiftMaster, Chamberlain, Genie, or Craftsman opener, I’ve got you covered with detailed instructions that will save you time, money, and the headache of calling a technician.
Understanding Garage Door Opener Programming: The Basics
Before we dive into the specific steps, it’s important to understand what’s actually happening when you “program” your garage door opener. Modern garage door openers use radio frequency technology to communicate between your remote control, keypad, and the main opener unit [2]. When you program a remote, you’re essentially teaching the opener to recognize and respond to a specific radio signal.
Most garage door openers manufactured after 1993 use what’s called “rolling code” technology for security purposes [3]. This means that every time you use your remote, it sends a different code to the opener, making it virtually impossible for someone to intercept and copy your signal. This is a significant improvement over older fixed-code systems that used the same signal every time.
Expert Insight: “Rolling code technology generates over 4 billion different codes, making garage door openers one of the most secure wireless access systems in your home.” – Chamberlain Group Technical Documentation [4]
The programming process involves putting your garage door opener into “learn mode” and then transmitting a signal from your remote or keypad. During this brief window, typically 30 seconds, the opener “learns” to recognize that specific device and adds it to its memory. Most modern openers can store multiple remotes and keypads, usually between 3 to 40 devices depending on the model and manufacturer [5].
Key Programming Components
| Component | Function | Typical Range |
|---|---|---|
| Learn Button | Activates programming mode | N/A |
| LED Indicator | Shows programming status | 30-second window |
| Remote Control | Transmits programming signal | 50-100 feet |
| Keypad | Provides PIN-based access | 20-50 feet |
Understanding this basic concept will help you troubleshoot issues and feel more confident as we move through the programming steps. Remember, you’re not just pushing buttons randomly – you’re facilitating a digital handshake between your devices.

Safety First: Essential Preparations Before Programming
Safety should always be your top priority when working with garage door systems. While programming remotes and keypads is generally a low-risk activity, garage door openers are powerful machines that can cause serious injury if not handled properly [6]. Before you begin any programming procedure, take these essential safety steps.
First and most importantly, clear the entire garage door area of any obstructions. This includes vehicles, bicycles, tools, storage boxes, or anything else that might be in the path of the garage door. Even though you’re only programming and not necessarily operating the door, it’s possible that the door might activate during the process, especially if you accidentally press the wrong button or if there’s interference from other devices.
Safety Warning: According to the International Door Association, garage doors are the largest moving object in most homes, weighing 150-400 pounds. Always ensure the area is clear before any programming activities [7].
Ensure that all people and pets are clear of the garage door area before you begin. Children are naturally curious about garage doors, and the programming process might involve the door moving unexpectedly. It’s best to have children and pets in a different area of the house while you work.
Check that your garage door is properly balanced and in good working condition before attempting to program any devices. A door that’s off its tracks, has broken springs, or is otherwise damaged should be repaired by a professional before you add new remotes or keypads to the system [8]. Programming devices to operate a malfunctioning door can be dangerous and may cause additional damage.
Pre-Programming Safety Checklist
- Clear all obstructions from garage door area
- Remove people and pets from work area
- Verify garage door is properly balanced
- Check that door operates smoothly manually
- Ensure adequate lighting in work area
- Have sturdy ladder available if needed
- Keep emergency release cord accessible
If your garage door opener is mounted on the ceiling, you’ll likely need a sturdy ladder to reach the learn button. Make sure your ladder is in good condition, properly positioned, and that you have someone to spot you if possible. Never overreach while on a ladder – it’s better to climb down and reposition the ladder than to risk a fall.
Have all your programming materials ready before you start. This includes your new remote or keypad, fresh batteries if needed, your garage door opener manual, and a pen and paper to write down any codes or settings. The programming window is typically only 30 seconds, so having everything prepared will help ensure success on your first attempt.
Finally, if you’re working with an older garage door opener (manufactured before 1993), be aware that these systems may not have the same safety features as modern openers [9]. Exercise extra caution and consider having a professional evaluate the system if you have any concerns about its safety or reliability.
Identifying Your Garage Door Opener and Locating the Learn Button
The key to successful garage door opener programming lies in understanding your specific system and locating the crucial “learn” or “program” button. This small but mighty button is the gateway to programming any new device to work with your opener, and its location and appearance can vary significantly between manufacturers and models.
Most garage door openers will have a label or sticker somewhere on the motor unit that identifies the brand, model number, and manufacturing date. This information is invaluable for troubleshooting and finding specific programming instructions [10]. Common locations for this information include the back of the motor unit, the side panels, or sometimes on a label attached to the light lens cover.
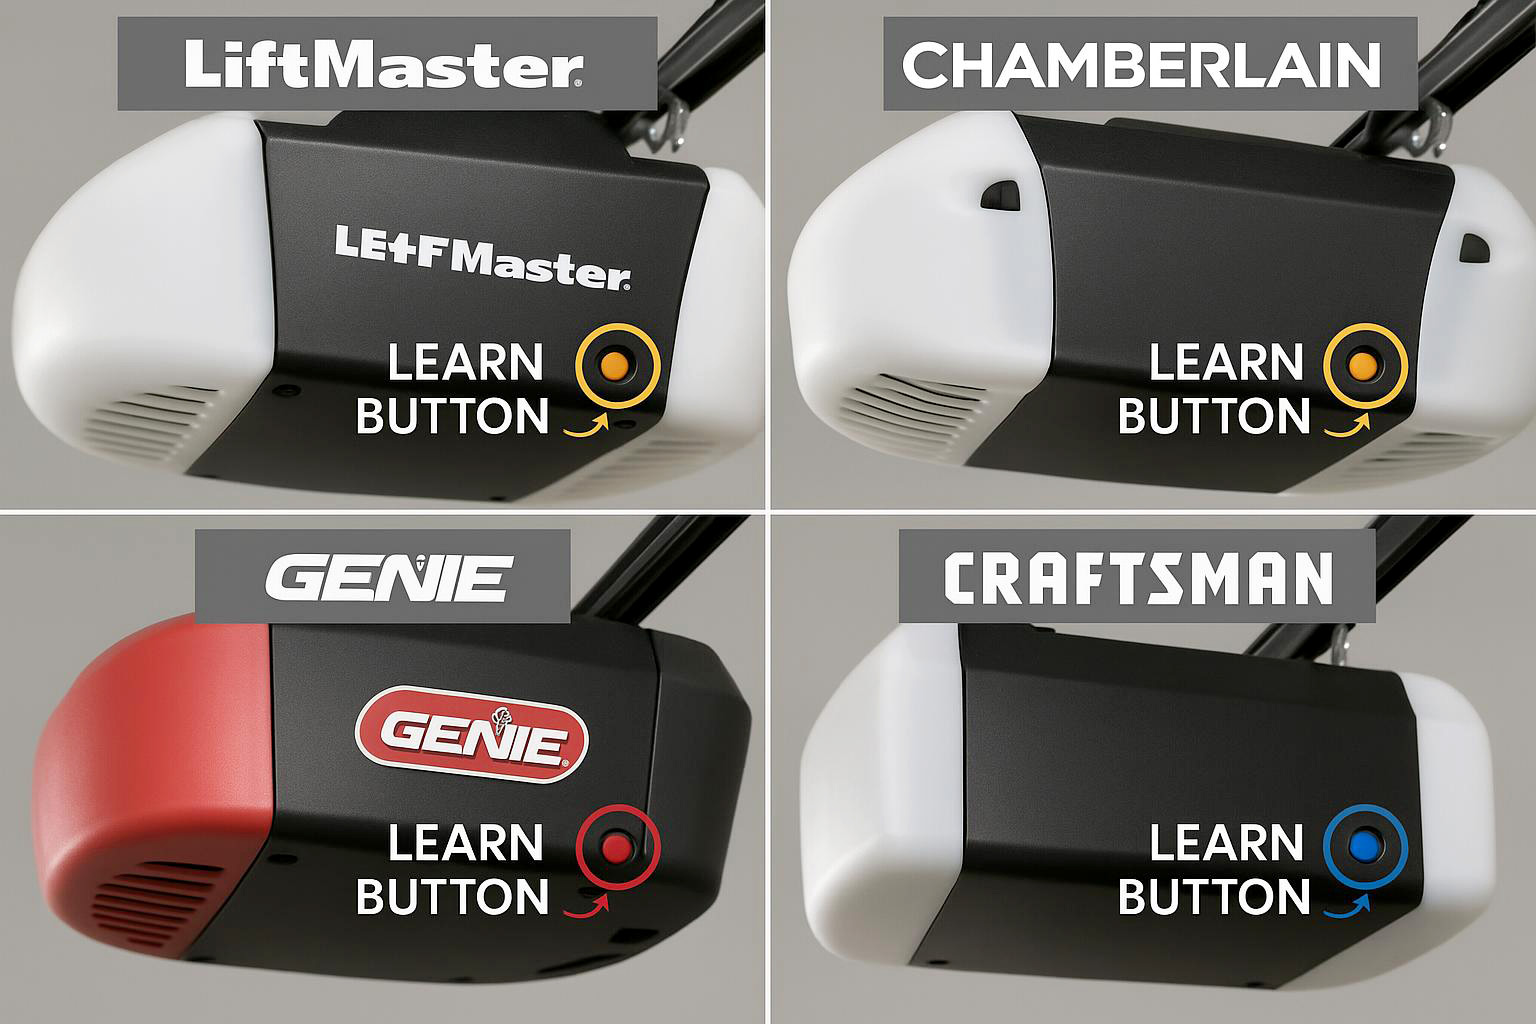
Learn Button Identification by Brand
| Brand | Learn Button Color | Technology | Compatibility |
|---|---|---|---|
| LiftMaster/Chamberlain (2011+) | Yellow/Orange | Security+ 2.0 | Most current remotes |
| LiftMaster/Chamberlain (Legacy) | Purple | Security+ | Limited compatibility |
| Genie (Current) | Red/Blue | Intellicode | Genie-specific devices |
| Craftsman | Yellow/Orange | Security+ 2.0 | Chamberlain compatible |
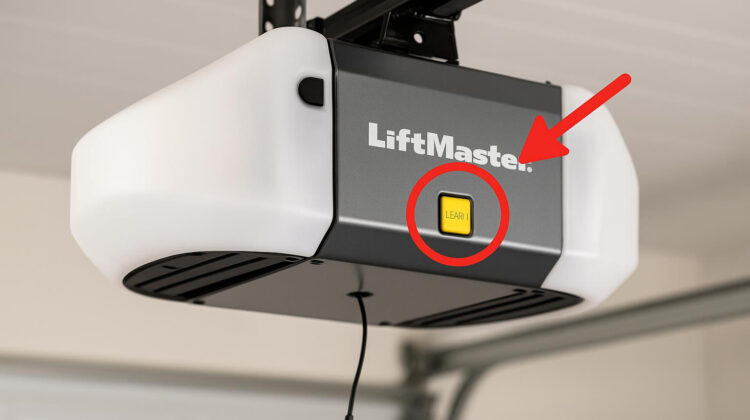
The learn button is typically located on the back or side of the garage door opener motor unit, which is the large box that hangs from your garage ceiling. On most Chamberlain and LiftMaster models, you’ll find it near the antenna wire, often behind a light lens cover that you may need to remove or lift up [11]. The button is usually small, about the size of a pencil eraser, and may be colored to indicate the type of technology your opener uses.
For LiftMaster and Chamberlain openers manufactured after 2011, the learn button color is particularly important. A yellow or orange learn button indicates Security+ 2.0 technology, which is the most current and secure system [12]. Purple buttons typically indicate Security+ technology (the previous generation), while red, orange, or blue buttons may indicate older DIP switch or fixed code systems. The color of your learn button will determine which remotes and keypads are compatible with your system.
Technical Note: “Security+ 2.0 technology uses a three-button remote programming method that provides enhanced security and eliminates the need for DIP switch programming.” – LiftMaster Technical Manual [13]
Genie garage door openers often have their learn button in a slightly different location, typically on the motor unit itself but sometimes integrated into the control panel. Genie systems may use different terminology, sometimes calling it a “program” button instead of a “learn” button, but the function is the same [14].
Some newer garage door openers, particularly those with smart technology or LCD control panels, may have the programming function integrated into a menu system rather than using a physical button. These systems typically have a wall-mounted control panel with a digital display that allows you to navigate through programming options using arrow keys or a similar interface.
If you’re having trouble locating the learn button on your specific model, don’t panic. Check your owner’s manual first, as it will have a diagram showing the exact location. If you don’t have the manual, most manufacturers provide downloadable versions on their websites [15]. You can also look for online videos specific to your opener model, as visual demonstrations can be incredibly helpful for identifying the correct button.
It’s worth noting that some very old garage door openers (typically those manufactured before the mid-1990s) may not have a learn button at all. These systems used DIP switches or other methods for programming, and the process can be quite different [16]. If you have an older system without a learn button, you may need to consult a professional or consider upgrading to a newer, more secure opener.
Step-by-Step Remote Control Programming Instructions
Programming a garage door remote is typically the most straightforward programming task you’ll encounter, and once you understand the basic process, you’ll be able to program virtually any remote to any compatible opener. The exact steps may vary slightly between manufacturers, but the fundamental process remains consistent across most modern systems.
Method 1: Programming Using the Garage Door Opener Learn Button
This is the most common and reliable method for programming garage door remotes, and it works with the vast majority of modern garage door openers regardless of brand [17]. This method requires you to access the learn button on the main opener unit, so you’ll need a ladder and should have someone spot you for safety.
Begin by ensuring your garage door area is completely clear of obstructions and that all people and pets are safely away from the door. Position your ladder securely beneath the garage door opener motor unit, making sure it’s stable and that you can comfortably reach the learn button without overextending.
Climb the ladder with your remote control in hand, and locate the learn button on your garage door opener. As discussed earlier, this button is typically on the back or side of the motor unit, often near the antenna wire. You may need to remove or lift a light lens cover to access it.
Step-by-step process:
- Press and immediately release the learn button once. You should see an LED light turn on near the button – this light indicates that the opener is now in programming mode and ready to learn a new device. The light will typically stay on for about 30 seconds, giving you a limited window to complete the programming process.
- While the LED light is on, press and hold the button on your remote control that you want to program to operate the garage door. Hold this button firmly until one of two things happens: either the garage door opener lights will flash, or you’ll hear two distinct clicking sounds from the opener [18]. Either of these signals indicates that the programming was successful.
- Test the remote immediately by pressing the programmed button to ensure the garage door responds correctly.
Pro Tip: “The 30-second programming window starts the moment you release the learn button. Have your remote ready and know exactly which button you want to program before you start.” – Garage Door Professional Association Guidelines [19]
If you have a multi-button remote and want to program additional buttons to operate other garage doors or devices, you’ll need to repeat this entire process for each button. Each button must be programmed individually, and you’ll need to press the learn button on the appropriate opener for each device you want to control.
Method 2: Programming Using a Wall Control with Learn Button
Some newer garage door openers have a learn button integrated into the wall-mounted control panel, which can make programming more convenient since you don’t need a ladder [20]. This method is particularly common with Chamberlain and LiftMaster systems that have advanced wall controls.
Start by locating the learn button on your wall control panel. This is typically a small button that may be labeled “learn,” “program,” or simply marked with a symbol. The exact location varies by model, but it’s usually near the main control buttons.
Programming steps:
- Press and release the learn button twice in quick succession. You should see an LED light begin to blink on the wall control, indicating that the system is now in programming mode.
- While the LED is blinking, press and hold the button on your remote control that you want to program. Continue holding the button until the garage door opener lights flash or you hear two clicking sounds.
- Verify successful programming by testing the remote operation.
Method 3: Programming Using LCD Smart Control Panels
If your garage door opener has an LCD control panel with menu options, the programming process involves navigating through the menu system rather than simply pressing a learn button [21]. This method is becoming more common with smart garage door openers and systems with advanced features.
Begin by locating the navigation buttons on your control panel, typically arrow keys or a similar interface below the LCD screen. Use these buttons to access the main menu, which may be labeled “Menu,” “Features,” or something similar.
Navigate through the menu options until you find “Program” or “Programming,” then select “Remote” or “Remote Control” from the submenu. The exact menu structure varies by manufacturer and model, so you may need to explore the options to find the correct path.
Once you’ve selected the remote programming option, the system will prompt you to press the button on your remote control. Press and hold the button you want to program until the garage door opener lights flash or you hear the confirmation clicks.
Universal Remote Programming Considerations
Universal garage door remotes are designed to work with multiple brands and models of garage door openers, but they often require additional programming steps beyond the standard process [22]. These remotes typically need to be set to the correct frequency and code type before they can be programmed to your specific opener.
Before attempting to program a universal garage door remote, check the packaging or manual to ensure it’s compatible with your garage door opener brand and model. Universal remotes often have compatibility charts that list supported opener models and any special requirements.
Many universal remotes require you to set DIP switches or enter a specific code sequence before programming. This process essentially tells the remote what “language” to speak when communicating with your opener [23]. Consult the remote’s manual for the specific steps required for your opener brand.
Common Programming Timeframes by Brand
| Brand | Programming Window | LED Indicator | Success Signal |
|---|---|---|---|
| LiftMaster/Chamberlain | 30 seconds | Steady light | 2 clicks or light flash |
| Genie | 30 seconds | Blinking light | Light flash |
| Craftsman | 30 seconds | Steady light | 2 clicks or light flash |
| Universal Remotes | Varies | Varies | Varies by model |
Once you’ve configured the universal remote for your opener type, you can typically follow the standard programming methods described above. However, some universal remotes may require you to hold multiple buttons simultaneously or follow a different sequence, so always refer to the specific instructions provided with your remote.
Troubleshooting Remote Programming Issues
If your remote doesn’t program successfully on the first attempt, don’t worry – this is common and usually easy to resolve. The most frequent cause of programming failure is timing issues, particularly if you don’t press the remote button quickly enough after activating the learn mode [24].
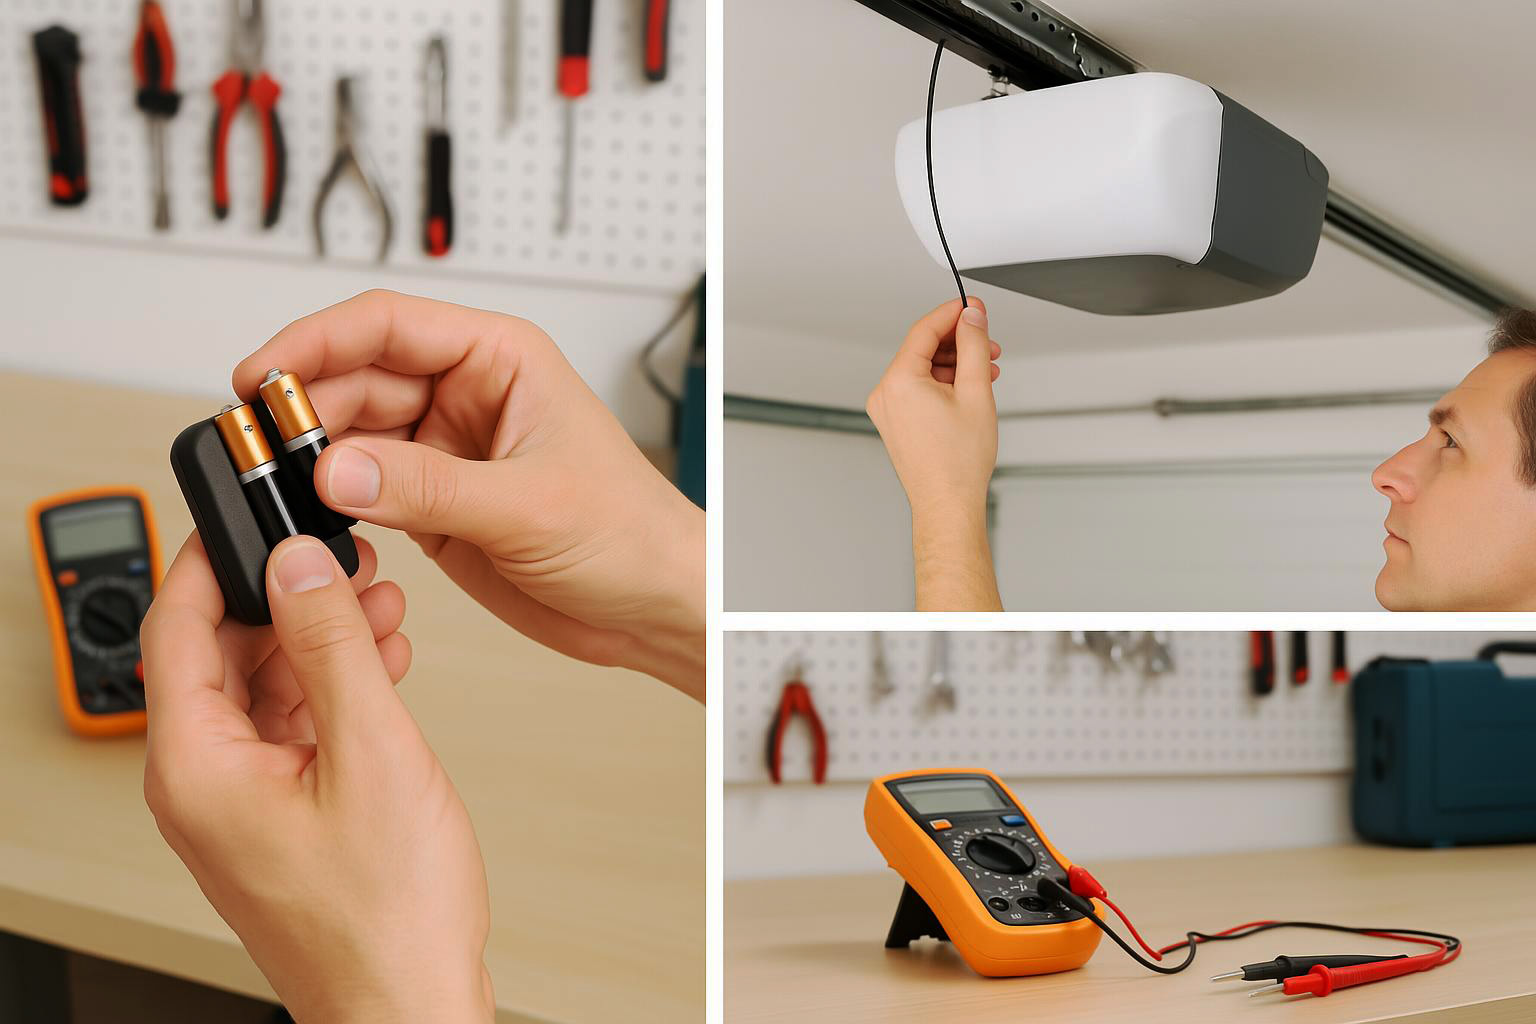
First, ensure that your remote has fresh batteries. Weak batteries can cause intermittent operation and programming failures [25]. Even if the remote seems to work sometimes, replace the batteries with fresh ones before attempting to program.
Check that you’re pressing the learn button correctly and that the LED light is actually turning on. If the light doesn’t activate, the learn button may not be functioning properly, or you may be pressing the wrong button. Double-check your opener manual to confirm the correct button location.
Make sure you’re within the 30-second programming window. If the LED light turns off before you press the remote button, you’ll need to start the process over. Have your remote ready and press the learn button and remote button in quick succession.
If you continue to have problems, try clearing the opener’s memory and starting fresh. Most openers have a procedure for erasing all programmed devices, which can resolve conflicts with previously programmed remotes that may be interfering with the new programming attempt [26].
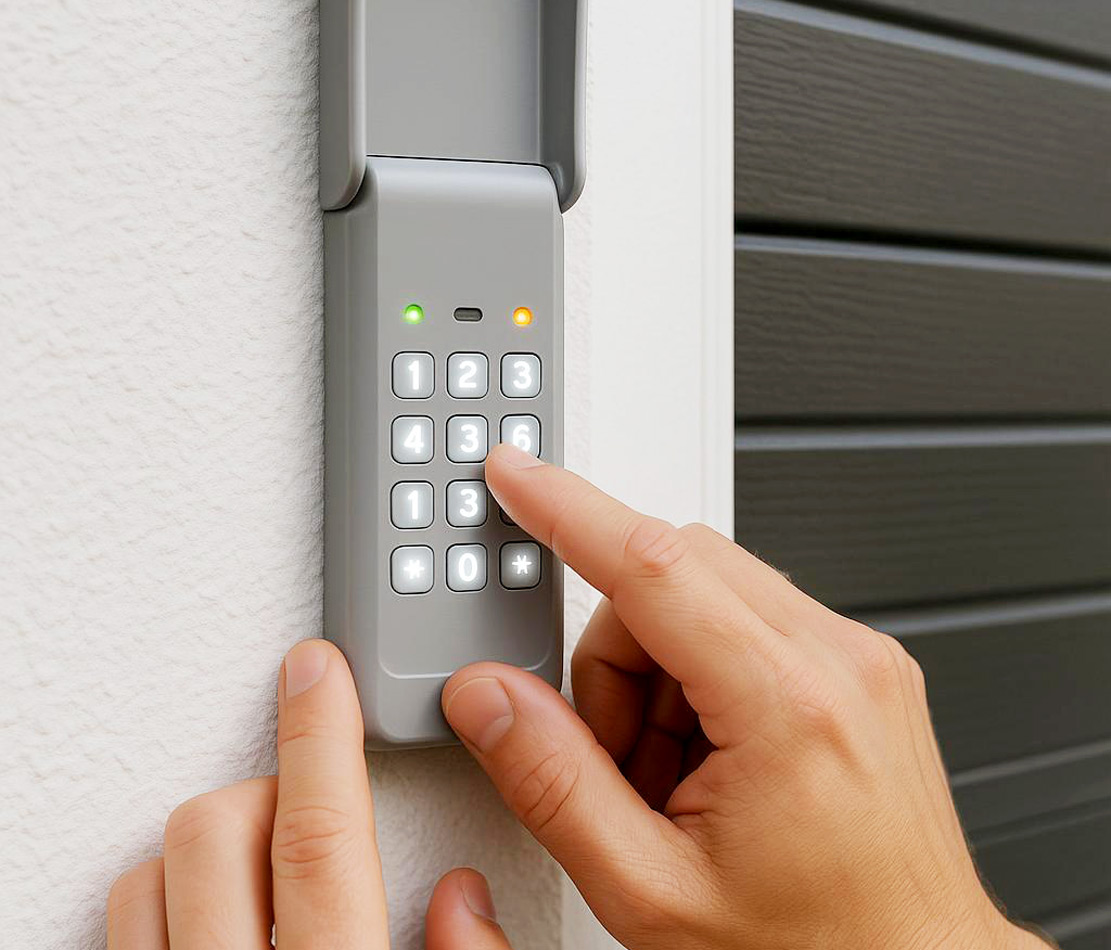
Programming Your Garage Door Keypad: Creating Secure Access Codes
Garage door keypads provide convenient access to your garage without requiring a remote control, making them perfect for family members who don’t drive, service personnel, or as a backup when you’ve locked your keys inside. Programming a keypad involves not only connecting it to your garage door opener but also setting up secure Personal Identification Numbers (PINs) that will control access to your garage.
Understanding Keypad Security and PIN Management
Modern garage door keypads use the same rolling code technology as remotes, making them highly secure when properly programmed and maintained [27]. However, the security of your keypad system depends heavily on choosing strong PINs and managing them responsibly. Unlike remotes that use automatically generated codes, keypads rely on PINs that you create, making your choices critical to maintaining security.
When selecting a PIN for your garage door keypad, avoid obvious combinations like 1234, 0000, or your house number. These are the first codes that potential intruders will try [28]. Instead, choose a four-digit combination that’s meaningful to you but not easily guessed by others. Consider using a combination of numbers from a significant date, but avoid your birthday or anniversary, as these can often be discovered through social media or public records.
Security Best Practice: “A strong garage door PIN should be as random as possible while still being memorable to authorized users. Avoid patterns like 1357 or 2468 that are easy to observe and guess.” – Home Security Institute Guidelines [29]
Many modern keypads also support temporary PINs, which are incredibly useful for providing access to service personnel, house sitters, or guests without compromising your main PIN [30]. These temporary codes can be set to expire after a certain number of uses or after a specific time period, giving you complete control over who has access to your garage and when.
Method 1: Programming Keypads Using the Wall Control Learn Button
If your garage door opener has a wall control with a learn button, this is often the most convenient method for programming keypads since it doesn’t require climbing a ladder to reach the main opener unit.
Begin by ensuring your garage door area is clear and safe. Locate the learn button on your wall control panel – this may be a small button labeled “learn” or “program,” and its exact location varies by model and manufacturer.
Programming sequence:
- Press the learn button twice in quick succession. You should see a Command LED begin to flash, indicating that the system is ready to learn a new device. This flashing light gives you approximately 30 seconds to complete the programming process.
- On your keypad, enter the four-digit PIN that you want to use for garage access. Choose this PIN carefully, as it will be your primary access code.
- After entering your chosen PIN, press the “Enter” or “Program” button on the keypad (the exact button name varies by keypad model).
- Look for confirmation – if the programming was successful, the garage door opener lights will blink, confirming that your PIN has been set and the keypad is now programmed to operate your garage door.
- Test the keypad immediately by entering your PIN followed by the appropriate button to operate the door.
Method 2: Programming Keypads Using the Main Opener Learn Button
When your wall control doesn’t have a learn button, or if you prefer to program directly through the main opener unit, you’ll need to access the learn button on the garage door opener motor itself [31].
Clear the garage door area and position your ladder securely beneath the opener unit. You’ll need to bring your keypad up the ladder with you, or have someone assist you by operating the keypad while you handle the learn button sequence.
Step-by-step process:
- Locate and press the learn button on the garage door opener motor unit. The LED light near the button will turn on, giving you 30 seconds to complete the programming sequence.
- Enter your chosen four-digit PIN on the keypad, then press and hold the “Enter” button until the garage door opener light blinks. This blinking confirms that the PIN has been successfully programmed and the keypad is now connected to your opener.
- Test the programming by climbing down and testing the keypad operation from ground level.
Advanced Keypad Features: Temporary PINs and Multiple Users
Many modern garage door keypads support advanced features that can significantly enhance the convenience and security of your garage access system [32]. Understanding and utilizing these features can help you create a more flexible and secure access control system for your home.
Temporary PINs are one of the most valuable features available on modern keypads. These codes allow you to provide garage access to service personnel, contractors, house sitters, or guests without sharing your main PIN or worrying about long-term security implications.
Setting up temporary PINs:
- Enter your current main PIN on the keypad.
- Press and hold the asterisk (*) button until the garage door opener light blinks three times. This sequence puts the keypad into temporary PIN programming mode.
- Enter your desired temporary four-digit PIN – make sure this is different from your main PIN and any other PINs you’ve previously set.
- Press the “Enter” button. The garage door opener lights will blink four times, confirming that the temporary PIN has been set.
- Specify the expiration method:
- For time-based expiration: Enter the number of hours (up to 255) and press the asterisk (*) button
- For use-based expiration: Enter the number of times the code can be used (up to 255) and press the pound (#) button
Keypad Programming Success Rates by Method
| Programming Method | Success Rate | Average Time | Difficulty Level |
|---|---|---|---|
| Wall Control Learn Button | 95% | 2-3 minutes | Easy |
| Main Unit Learn Button | 90% | 3-5 minutes | Moderate |
| LCD Menu System | 98% | 1-2 minutes | Easy |
| Temporary PIN Setup | 85% | 5-7 minutes | Moderate |
This temporary PIN feature is incredibly useful for situations like having repair work done while you’re away, allowing a house sitter access during a vacation, or providing access to family members who are visiting for a limited time [33].
Changing and Managing Existing PINs
Over time, you may need to change your garage door keypad PIN for security reasons, or simply because you want to use a different combination. The process for changing an existing PIN is straightforward and doesn’t require accessing the learn button on your opener.
PIN change procedure:
- Enter the existing PIN that you want to replace.
- Press and hold the pound (#) button until the garage door opener light blinks twice. This sequence tells the keypad that you want to change the current PIN.
- Enter your new four-digit PIN, then press the “Enter” button. The garage door opener lights will blink once, confirming that your PIN has been successfully changed.
- Test the new PIN immediately to ensure it’s working correctly and that you’ve entered it correctly.
If you move into a new home with an existing garage door keypad, it’s essential to change or clear any existing PINs for security reasons [34]. You have no way of knowing who might have access to the previous codes, so establishing your own PINs should be one of your first priorities.
Keypad Maintenance and Troubleshooting
Garage door keypads are exposed to weather and environmental conditions that can affect their performance over time. Regular maintenance and proper troubleshooting can help ensure reliable operation and extend the life of your keypad [35].
Battery maintenance is crucial for wireless keypads. Most keypads will give you warning signs when the battery is getting low, such as dim LED lights, slow response times, or intermittent operation. Replace the battery as soon as you notice these symptoms, as a failing battery can cause programming to be lost or prevent the keypad from operating reliably.
Weather protection is also important, even though most keypads are designed to be weather-resistant. Extreme temperatures, moisture, and direct sunlight can all affect keypad performance [36]. If your keypad is mounted in a location that receives direct sunlight for extended periods, consider relocating it to a more shaded area to prevent overheating and UV damage.
If your keypad stops responding or seems to have lost its programming, try replacing the battery first. If that doesn’t resolve the issue, you may need to reprogram the keypad using the methods described above. In some cases, clearing all programmed devices from your garage door opener and starting fresh can resolve persistent programming issues.
Brand-Specific Programming Instructions and Considerations
While the general principles of garage door opener programming remain consistent across manufacturers, each major brand has specific quirks, features, and requirements that can affect the programming process. Understanding these brand-specific details can save you time and frustration, especially when dealing with older models or advanced features.
LiftMaster and Chamberlain Programming Specifics
LiftMaster and Chamberlain are sister brands owned by the same parent company, so their programming procedures are nearly identical [37]. However, there are important distinctions based on the age and technology level of your specific opener that can significantly impact the programming process.
For LiftMaster and Chamberlain openers manufactured after 2011, you’ll typically encounter Security+ 2.0 technology, which is identified by a yellow or orange learn button [38]. These systems offer enhanced security and compatibility with a wide range of accessories, but they require specific programming procedures that differ slightly from older models.
When programming Security+ 2.0 systems, the learn button press is particularly important. You must press and immediately release the button – holding it too long can put the system into a different mode or cause programming to fail. The LED light will turn on and remain steady for exactly 30 seconds, during which time you must complete the remote or keypad programming sequence.
Technical Specification: “Security+ 2.0 technology operates on 315 MHz frequency with 100 billion code combinations, providing superior security compared to previous generations.” – Chamberlain Group Engineering Documentation [39]
One unique feature of newer LiftMaster systems is the integration with the myQ smart home platform. If your opener is Wi-Fi enabled and connected to the myQ app, you can actually program some devices through the smartphone app rather than using the traditional learn button method [40]. This can be particularly convenient for programming multiple devices or managing access when you’re away from home.
LiftMaster/Chamberlain Technology Evolution
| Generation | Years | Learn Button Color | Technology | Security Level |
|---|---|---|---|---|
| Security+ 2.0 | 2011-Present | Yellow/Orange | Rolling Code | Highest |
| Security+ | 2005-2011 | Purple | Rolling Code | High |
| DIP Switch | 1993-2005 | Red/Blue | Fixed Code | Moderate |
| Legacy | Pre-1993 | None | Fixed Code | Low |
For older LiftMaster and Chamberlain systems with purple learn buttons (Security+ technology), the programming process is similar, but these systems may have compatibility limitations with newer remotes and keypads [41]. Always check the compatibility information on your remote or keypad packaging to ensure it will work with your specific opener model.
Some LiftMaster models, particularly the 8500 and RJO20 series, use a different programming approach that involves the myQ Control Panel rather than a traditional learn button on the motor unit. For these models, you’ll need to access the programming functions through the wall-mounted control panel’s menu system [42].
Genie Garage Door Opener Programming
Genie garage door openers have their own unique programming procedures and terminology that can be confusing if you’re accustomed to other brands [43]. Understanding these differences is crucial for successful programming of Genie systems.
Current Genie models typically use what the company calls “Intellicode” technology, which provides rolling code security similar to other manufacturers. However, the programming process often involves different button combinations and timing than you might expect from other brands.
For most current Genie remotes, the programming process begins by locating the “Learn” or “Program” button on the garage door opener motor unit. However, Genie systems often require you to press and hold this button until you see specific LED light patterns, rather than the simple press-and-release method used by other manufacturers [44].
Genie-specific programming steps:
- Locate the Learn/Program button on the Genie opener motor unit.
- Press and hold the button until the LED light turns on and begins a specific blinking pattern (varies by model).
- Within the programming window, press and hold the remote button until the opener light flashes or you hear confirmation beeps.
- Test the remote to ensure successful programming.
When programming Genie keypads, the process can be more complex than other brands. Many Genie keypads require you to first put the keypad itself into programming mode by pressing specific button combinations, then complete the connection to the opener [45]. For example, some models require you to press and hold the “Program” and “Up/Down” arrow buttons simultaneously until the LED light turns on.
Genie Programming Note: “Genie Intellicode technology automatically changes the access code each time the remote control is used, with over 4.29 billion possible codes.” – Genie Company Technical Manual [46]
Genie’s older models, particularly those manufactured before 2011, may use different programming methods entirely. Some older Genie systems use DIP switches instead of learn buttons, requiring you to match switch positions between the remote and the receiver unit [47]. If you have an older Genie system, consult your owner’s manual or contact Genie customer support for specific programming instructions.
One important consideration with Genie systems is that they often have specific compatibility requirements between remotes, keypads, and opener models. A remote that works with one Genie model may not be compatible with another, even if they appear similar. Always verify compatibility before purchasing replacement or additional accessories.
Craftsman Garage Door Opener Programming
Craftsman garage door openers are actually manufactured by Chamberlain, so the programming procedures are typically identical to Chamberlain and LiftMaster systems [48]. However, there are some important considerations specific to Craftsman-branded products.
Most Craftsman openers follow the standard Chamberlain programming procedure: press and release the learn button, then press and hold the remote button within 30 seconds until the opener lights flash or you hear two clicks. The learn button location and appearance are typically the same as equivalent Chamberlain models.
However, some older Craftsman models, particularly those sold through Sears before the brand transition, may have unique programming requirements or may lack learn buttons entirely [49]. These older systems often used DIP switch programming, where you had to match switch positions between the remote and the opener.
If you have a Craftsman opener without a visible learn button, check for a small access panel or removable cover on the motor unit. Some models have the learn button hidden behind a panel that needs to be removed or slid aside. If you still can’t locate a learn button, your opener may be old enough to require DIP switch programming or professional service.
For Craftsman openers with smart features or Wi-Fi connectivity, the programming process may involve the myQ app, just like equivalent LiftMaster models [50]. These systems offer the convenience of smartphone-based programming and remote access control.
Universal and Third-Party Device Programming
Universal remotes and keypads are designed to work with multiple brands of garage door openers, but they often require additional setup steps before the standard programming process [51]. Understanding these requirements can save you significant time and frustration.
Most universal devices require you to first configure them for your specific opener brand and model. This typically involves setting DIP switches, entering manufacturer codes, or following specific button sequences that tell the universal device what “language” to speak when communicating with your opener.
Universal device setup process:
- Identify your opener brand and model from the compatibility chart included with the universal device.
- Configure the universal device according to the manufacturer’s instructions (DIP switches, code entry, etc.).
- Follow the standard programming procedure for your opener brand.
- Test thoroughly to ensure all functions work correctly.
Before attempting to program a universal device, carefully read the compatibility information and setup instructions. Many universal remotes come with code sheets that list specific setup procedures for different opener brands and models [52]. Some newer universal devices can automatically detect your opener type, but this feature isn’t universal and may not work with all systems.
When programming universal devices, you may need to follow modified versions of the standard programming procedures. For example, some universal remotes require you to hold multiple buttons simultaneously during programming, or to repeat the programming sequence multiple times to ensure proper synchronization.
If you’re having trouble with a universal device, try programming it using the most basic method first, then explore advanced features once you’ve established basic connectivity. Many programming failures with universal devices occur because users try to set up advanced features before establishing the basic connection to the opener [53].
Smart Garage Door Opener Programming
Modern smart garage door openers with Wi-Fi connectivity and smartphone app integration offer additional programming options that can be more convenient than traditional methods, but they also introduce new considerations and potential complications [54].
Smart openers typically support both traditional learn button programming and app-based programming. The app-based method can be particularly useful for programming multiple devices or for managing access when you’re not physically present at the garage.
When using app-based programming, ensure that your opener is properly connected to your home Wi-Fi network and that you have the latest version of the manufacturer’s app installed on your smartphone [55]. The app will typically guide you through the programming process with step-by-step instructions specific to your opener model.
One advantage of smart opener programming is the ability to assign names and access schedules to different devices. For example, you can program a keypad with a temporary PIN that only works during specific hours, or set up notifications when certain remotes are used [56].
However, smart features can also introduce complications. If your Wi-Fi network is unstable or if there are connectivity issues between your opener and the app, programming may fail or devices may lose their programming unexpectedly. Always test smart-programmed devices thoroughly and consider having backup traditional remotes programmed as well.
Comprehensive Troubleshooting Guide: Solving Common Programming Problems
Even with careful preparation and following the correct procedures, garage door opener programming doesn’t always go smoothly on the first attempt. Understanding common problems and their solutions can help you quickly diagnose and resolve issues, saving you time and the expense of calling a professional technician [57].
Remote Control Programming Failures
When a remote control fails to program properly, the issue usually falls into one of several common categories. Identifying the specific type of failure can help you choose the most effective solution and avoid wasting time on ineffective troubleshooting steps.
Battery-related issues are among the most common causes of programming failures, even when the remote appears to be working normally [58]. Weak batteries can cause intermittent operation that may allow the remote to operate an already-programmed opener while preventing successful programming of new connections. Always start troubleshooting by installing fresh, high-quality batteries in your remote, even if the existing batteries seem to be working.
Troubleshooting Statistic: “Approximately 40% of garage door remote programming failures are resolved simply by replacing the remote’s batteries with fresh alkaline batteries.” – Garage Door Repair Industry Report [59]
Timing issues are another frequent cause of programming failures. The 30-second programming window on most garage door openers is shorter than many people realize, and it’s easy to miss the window if you’re not prepared [60]. Practice the button sequence before pressing the learn button, and have your remote ready in your hand. If you’re using a ladder to reach the opener, consider having someone assist you by operating the remote while you handle the learn button.
Common Programming Failure Causes and Solutions
| Problem | Frequency | Primary Cause | Solution |
|---|---|---|---|
| No response from opener | 35% | Dead/weak batteries | Replace batteries |
| Timing window missed | 25% | Slow button sequence | Practice timing |
| Compatibility issues | 20% | Wrong remote type | Check compatibility |
| Interference problems | 15% | Electronic interference | Clear interference sources |
| Hardware malfunction | 5% | Faulty components | Professional service |
Compatibility problems can prevent programming even when you follow all the correct steps. Not all remotes work with all garage door openers, and compatibility issues are particularly common with universal remotes or when trying to use newer remotes with older openers [61]. Check the compatibility information on your remote’s packaging or manual, and verify that it specifically lists your opener brand and model.
If your remote has multiple buttons and you’re trying to program a specific button, make sure you’re pressing the correct button during the programming sequence. Some people accidentally press the wrong button, then wonder why the remote doesn’t work as expected. Each button on a multi-button remote must be programmed individually to its intended function.
Interference from other electronic devices can occasionally disrupt the programming process [62]. If you’re having persistent problems, try turning off other electronic devices in the garage area, including fluorescent lights, radios, and wireless devices. Some LED light bulbs can also cause interference with garage door opener signals.
Keypad Programming and PIN Issues
Keypad programming failures often involve different issues than remote programming problems, particularly because keypads require both device programming and PIN setup. Understanding the dual nature of keypad programming can help you identify whether the problem is with the device connection or the PIN configuration [63].
PIN entry errors are surprisingly common during keypad programming. When entering your chosen PIN during the programming sequence, make sure you’re pressing each number clearly and deliberately. Some keypads are sensitive to rapid or light button presses, and a missed digit can cause the entire programming sequence to fail.
If your keypad appears to program successfully but doesn’t operate the garage door when you enter your PIN, the issue may be with your PIN entry technique rather than the programming itself [64]. Try entering your PIN more slowly, with deliberate pauses between digits. Some keypads require you to press the buttons firmly and hold them briefly to register the input properly.
Weather-related issues can affect keypad programming and operation, particularly in extreme temperatures. Cold weather can make keypad buttons less responsive, while hot weather can cause the keypad to become overly sensitive or to malfunction [65]. If you’re programming a keypad in extreme weather conditions, consider waiting for more moderate temperatures or bringing the keypad indoors to warm up or cool down before programming.
Keypad mounting location can also affect programming success. If your keypad is mounted too far from the garage door opener, the signal may be too weak for reliable programming or operation [66]. Most keypads should be within 20-30 feet of the opener for optimal performance, and obstacles like metal siding or concrete walls can reduce the effective range.
For keypads with temporary PIN features, programming failures often occur when users don’t properly understand the sequence for setting time or use limits. When setting a temporary PIN, make sure you complete the entire sequence, including specifying whether the PIN expires based on time or number of uses [67]. An incomplete temporary PIN setup can cause the feature to not work as expected.
Learn Button and System Issues
Problems with the learn button itself or the garage door opener system can prevent successful programming of any device. These issues often require different troubleshooting approaches than device-specific problems [68].
If the learn button doesn’t seem to activate when pressed, first verify that you’re pressing the correct button. Some garage door openers have multiple buttons on the motor unit, and it’s easy to press the wrong one. The learn button is typically smaller than other buttons and may be recessed or protected by a cover.
Power issues can prevent the learn button from functioning properly. If your garage door opener has been unplugged or has experienced a power outage, it may need to be reset before programming functions will work [69]. Try unplugging the opener for 30 seconds, then plugging it back in and waiting a few minutes before attempting to program devices.
Some garage door openers have a maximum number of devices that can be programmed into their memory. If you’ve reached this limit, you may need to clear some existing devices before programming new ones [70]. Most openers can store between 3 and 40 devices, depending on the model and manufacturer.
Memory Management Tip: “Modern garage door openers typically store 40+ devices, but older models may only accommodate 3-8 remotes. Check your manual for specific memory limitations.” – Technical Service Manual [71]
Memory corruption can occasionally cause programming problems, particularly in older systems or after power surges. If you’re having persistent programming issues with multiple devices, try performing a factory reset on your garage door opener [72]. This will erase all programmed devices and return the system to its default settings, allowing you to start fresh with programming.
Antenna problems can prevent the garage door opener from receiving signals from remotes and keypads during programming. Check that the antenna wire hanging from your opener is fully extended and not damaged [73]. The antenna should hang straight down and not be coiled or tucked up against the opener unit.
Advanced Troubleshooting Techniques
When basic troubleshooting steps don’t resolve programming issues, more advanced techniques may be necessary. These approaches require a deeper understanding of how garage door opener systems work and should be attempted only after simpler solutions have failed [74].
Signal strength testing can help identify range and interference issues. Try programming devices at different distances from the opener to determine if range is a factor. If devices only program when very close to the opener, you may have antenna problems or interference issues that need to be addressed.
Frequency conflicts can occur when multiple garage door openers in the same area use similar frequencies [75]. This is particularly common in densely populated neighborhoods or apartment complexes. If you suspect frequency conflicts, try programming devices at different times of day when neighboring openers are less likely to be in use.
For persistent compatibility issues, research the specific frequency and coding system used by your garage door opener. Some older systems use fixed frequencies that may conflict with newer devices, while some newer systems use frequencies that aren’t supported by older remotes [76]. Understanding your system’s specifications can help you choose compatible replacement devices.
Professional diagnostic tools can identify problems that aren’t apparent through visual inspection or basic testing. If you’ve exhausted all other troubleshooting options and are still having programming issues, consider having a garage door technician evaluate your system with specialized equipment [77].
When to Call a Professional
While most garage door opener programming issues can be resolved through DIY troubleshooting, some situations require professional intervention. Recognizing when you’ve reached the limits of DIY repair can save you time and prevent potential damage to your system [78].
Electrical problems with the garage door opener itself are beyond the scope of DIY programming troubleshooting. If your opener doesn’t respond to wall controls, doesn’t have power to the motor unit, or shows signs of electrical damage, contact a qualified technician before attempting any programming procedures.
Safety system malfunctions should always be addressed by professionals. If your garage door doesn’t reverse when it encounters an obstruction, if the safety sensors aren’t working properly, or if the door operates erratically, have the system inspected and repaired before programming additional devices [79].
Structural problems with the garage door or track system can affect opener performance and programming. If your door is off its tracks, has broken springs, or doesn’t operate smoothly, these issues should be resolved by a professional before attempting to program new devices [80].
For very old garage door openers (typically those manufactured before 1993), professional evaluation may be necessary to determine if the system is worth repairing or if replacement would be more cost-effective. Older systems may lack modern safety features and may not be compatible with current remotes and keypads [81].
Security Considerations and Best Practices
Programming your garage door opener isn’t just about convenience – it’s also about maintaining the security of your home and family. Understanding the security implications of your programming choices and following best practices can help protect your property while ensuring reliable access for authorized users [82].
Understanding Rolling Code Technology and Security
Modern garage door openers use sophisticated security systems that are far more advanced than the simple fixed-code systems of the past. Rolling code technology, also known as “hopping code,” generates a new access code every time you use your remote or keypad, making it virtually impossible for criminals to intercept and replay your garage door signals [83].
When you press your garage door remote, the device generates a unique code based on a mathematical algorithm shared with your garage door opener. The opener recognizes this code as valid, operates the door, and then both the remote and opener advance to the next code in the sequence [84]. This process happens automatically and invisibly, providing security without requiring any action on your part.
Security Technology Insight: “Rolling code systems cycle through over 4 billion unique codes, with the mathematical probability of code duplication being virtually zero during the operational lifetime of the device.” – Security Technology Institute [85]
However, rolling code technology is only as secure as your programming and maintenance practices. If you lose a remote or keypad, it’s crucial to remove it from your opener’s memory immediately [86]. A lost device that remains programmed to your system represents a significant security vulnerability, as anyone who finds it will have access to your garage.
Security Technology Comparison
| Technology Type | Security Level | Code Variations | Vulnerability Risk |
|---|---|---|---|
| Rolling Code (Current) | Very High | 4+ Billion | Very Low |
| Fixed Code (Legacy) | Low | 256-4096 | High |
| DIP Switch (Obsolete) | Very Low | 256 | Very High |
| Smart/Encrypted | Highest | Unlimited | Minimal |
The security of keypad systems depends heavily on your PIN choices and management practices. Avoid using obvious combinations like your house number, birthday, or simple sequences like 1234 [87]. Instead, choose PINs that are meaningful to you but difficult for others to guess. Consider using a combination of numbers from a significant date that isn’t publicly known, or create a pattern on the keypad that’s easy for you to remember but not obvious to observers.
Managing Multiple Users and Access Control
Modern families often need to provide garage access to multiple family members, service personnel, and occasional guests. Developing a systematic approach to access management can help maintain security while providing necessary convenience [88].
For family members, consider programming individual remotes rather than sharing a single device. This approach allows you to track who has access and makes it easier to manage lost or stolen remotes [89]. Many garage door openers can store dozens of programmed devices, so there’s typically no limitation on providing individual access to family members.
When programming remotes for teenagers or young adults, consider discussing responsible use and the importance of not sharing access with friends. A garage door remote provides access not just to the garage, but potentially to your entire home if you have an interior door connecting the garage to the house [90].
For service personnel like housekeepers, lawn care providers, or repair technicians, temporary keypad PINs are often the most secure and convenient solution. These codes can be set to expire after a specific time period or number of uses, eliminating the need to remember to change codes after service is completed [91].
Keep a written record of all programmed devices and PINs, stored in a secure location separate from your garage. This record should include when each device was programmed, who has access to it, and when temporary codes are set to expire [92]. Regular review of this list can help you identify devices that should be removed from the system.
Protecting Against Common Security Threats
While modern garage door openers are generally secure, understanding potential vulnerabilities can help you take appropriate precautions to protect your home and family [93].
Signal interception, while difficult with rolling code systems, is still theoretically possible with sophisticated equipment. To minimize this risk, avoid using your garage door remote in public areas where criminals might be monitoring for signals [94]. This is particularly important in parking lots or other areas where you might be observed using your remote.
Physical security of remotes and keypads is often more important than electronic security. Don’t leave remotes visible in your car, especially if your car is parked outside overnight [95]. Consider using a visor clip or other concealed storage method to keep remotes out of sight.
For keypads, be aware of your surroundings when entering your PIN. Shield the keypad with your body or hand to prevent others from observing your code entry [96]. If you notice someone watching you enter your PIN, consider changing the code as a precaution.
Home automation integration can introduce new security considerations. If your garage door opener is connected to a smart home system or Wi-Fi network, ensure that your home network is properly secured with strong passwords and current security protocols [97]. A compromised home network could potentially provide access to your garage door controls.
Regular Security Maintenance and Updates
Maintaining the security of your garage door system requires ongoing attention and periodic updates to your programming and access management practices [98].
Conduct regular audits of programmed devices and access codes. At least twice a year, review who has access to your garage and remove any devices or codes that are no longer needed [99]. This is particularly important after family changes, such as children moving out, divorce, or changes in service providers.
Update keypad PINs periodically, especially if you suspect they may have been compromised or if they’ve been shared with temporary users. Even if you haven’t had any security concerns, changing PINs annually is a good security practice that can help prevent unauthorized access [100].
Test all programmed devices regularly to ensure they’re working properly. A device that’s programmed but not functioning correctly could indicate tampering or technical problems that need attention [101]. This testing should include both remotes and keypads, as well as any smart home integrations.
Keep your garage door opener’s firmware updated if it has smart features or Wi-Fi connectivity. Manufacturers occasionally release security updates that address newly discovered vulnerabilities [102]. Check your opener manufacturer’s website or app for available updates and install them promptly.
Maintenance Tips for Optimal Performance
Proper maintenance of your programmed devices and garage door opener system can prevent many common problems and extend the life of your equipment. Understanding what maintenance tasks you can perform yourself and when to call professionals can help keep your system running smoothly [103].
Remote Control and Keypad Maintenance
Battery maintenance is the most important aspect of remote and keypad care. Most garage door remotes use standard alkaline batteries that should be replaced annually, even if the device seems to be working normally [104]. Weak batteries can cause intermittent operation, reduced range, and programming problems.
When replacing batteries, use high-quality alkaline batteries from reputable manufacturers. Avoid using rechargeable batteries in garage door remotes, as they typically provide lower voltage that can cause performance issues [105]. Some newer remotes use lithium batteries, which last longer but are more expensive to replace.
Clean your remotes and keypads periodically to prevent dirt and debris from interfering with button operation. Use a slightly damp cloth to wipe down the exterior, and use compressed air to blow out any debris from around the buttons [106]. Avoid using harsh chemicals or excessive moisture that could damage the electronic components.
For keypads exposed to weather, pay particular attention to the button area and any seals around the battery compartment. Water intrusion can cause corrosion and electronic failure, so ensure that all seals are intact and that the keypad is properly mounted to shed water [107].
Store spare remotes in a cool, dry location, and remove the batteries if they won’t be used for extended periods. Battery leakage can cause permanent damage to remote controls, and this damage is often not covered by warranties [108].
Garage Door Opener System Maintenance
While this guide focuses on programming, basic maintenance of your garage door opener system can prevent many programming-related problems and ensure reliable operation of your programmed devices [109].
Keep the antenna wire on your garage door opener fully extended and free from damage. The antenna is crucial for receiving signals from your remotes and keypads, and damage to this wire can cause range problems and programming failures [110]. The antenna should hang straight down from the opener and not be coiled or tucked against the unit.
Lubricate moving parts of your garage door system according to the manufacturer’s recommendations. While this doesn’t directly affect programming, a smoothly operating door puts less strain on the opener motor and can prevent electrical problems that might interfere with programming functions [111].
Test your garage door’s safety features regularly, including the auto-reverse function and safety sensors. These safety systems are required by law and are crucial for preventing injury [112]. If safety features aren’t working properly, have them repaired by a professional before programming additional devices.
Keep the area around your garage door opener clean and free from stored items. Good air circulation around the motor unit helps prevent overheating, and clear access makes it easier to perform programming and maintenance tasks [113].
Seasonal Considerations and Environmental Factors
Different seasons and environmental conditions can affect the performance of your garage door opener and programmed devices. Understanding these factors can help you anticipate and prevent seasonal problems [114].
Cold weather can affect battery performance in remotes and keypads, causing reduced range and slower response times. Consider keeping a spare remote indoors during winter months, and be prepared to replace batteries more frequently in extreme cold [115].
Hot weather can cause electronic components to overheat, particularly in keypads mounted in direct sunlight. If your keypad is experiencing problems during hot weather, consider relocating it to a more shaded area or installing a small awning to provide protection from direct sun [116].
Humidity and moisture can cause corrosion in electronic components and battery compartments. In humid climates, check your devices more frequently for signs of corrosion, and consider using moisture-absorbing packets in storage areas where you keep spare remotes [117].
Power outages can affect the programming of some garage door openers, particularly older models. After extended power outages, test all your programmed devices to ensure they’re still working properly [118]. Some systems may require reprogramming after power is restored.
Long-term Planning and Upgrades
As technology continues to evolve, consider how your garage door access needs might change over time and plan accordingly for future upgrades or modifications [119].
Smart home integration is becoming increasingly popular, and many homeowners are upgrading their garage door openers to include Wi-Fi connectivity and smartphone app control. If you’re planning such an upgrade, research compatibility between your existing remotes and keypads and the new system [120].
Security standards continue to evolve, and older garage door openers may eventually become incompatible with newer remotes and keypads. If your opener is more than 10-15 years old, start researching replacement options and consider upgrading before compatibility becomes an issue [121].
Family needs change over time, and your access control requirements may evolve as children grow up, elderly family members need easier access, or your work situation changes. Periodically review your access control setup to ensure it still meets your family’s needs [122].
Technology improvements in battery life, range, and features continue to advance. When replacing remotes or keypads, research the latest available options to take advantage of improvements in reliability, security, and convenience features [123].
Conclusion: Mastering Your Garage Door Programming
Programming your garage door opener doesn’t have to be a mysterious or intimidating process. With the right knowledge, proper preparation, and a systematic approach, you can successfully program remotes, keypads, and other devices to work reliably with your garage door system. The key is understanding that while the basic principles remain consistent across different brands and models, attention to specific details and requirements can make the difference between success and frustration.
Throughout this comprehensive guide, we’ve covered everything from the fundamental concepts of rolling code technology to advanced troubleshooting techniques for persistent problems. We’ve explored the specific requirements of major manufacturers like LiftMaster, Chamberlain, Genie, and Craftsman, and discussed how to handle both current models with modern security features and older systems that may require different approaches [124].
The importance of safety cannot be overstated when working with garage door systems. Always prioritize clearing the work area, using proper ladder safety, and ensuring that your garage door is in good working condition before attempting any programming procedures [125]. Remember that while programming is generally a low-risk activity, garage door openers are powerful machines that demand respect and careful handling.
Security considerations should be an integral part of your programming strategy, not an afterthought. Choose strong PINs for keypads, manage access responsibly, and maintain an up-to-date inventory of all programmed devices [126]. The convenience of garage door access comes with the responsibility of protecting your home and family from unauthorized entry.
Regular maintenance of your programmed devices and the garage door system itself will help ensure reliable operation and extend the life of your equipment. Simple tasks like battery replacement, cleaning, and periodic testing can prevent many common problems and help you identify issues before they become serious [127].
As technology continues to evolve, stay informed about new features and security improvements that might benefit your home. Smart home integration, improved battery life, and enhanced security features are constantly being developed, and understanding these advances can help you make informed decisions about upgrades and replacements [128].
Remember that while this guide provides comprehensive information for most common situations, every garage door system is unique, and some problems may require professional attention. Don’t hesitate to consult with a qualified garage door technician when you encounter issues beyond your comfort level or when safety concerns arise [129].
The time you invest in properly programming and maintaining your garage door opener system will pay dividends in convenience, security, and peace of mind. A well-programmed system provides reliable access for your family while keeping unauthorized users out, and proper maintenance ensures that this security and convenience will continue for years to come.
Whether you’re programming your first garage door remote or troubleshooting a complex multi-device system, the principles and procedures outlined in this guide will serve you well. Take your time, follow the steps carefully, and don’t be afraid to start over if something doesn’t work as expected. With patience and persistence, you’ll master the art of garage door opener programming and join the ranks of confident DIY homeowners who can handle their own garage door access needs.
Have questions about programming your specific garage door opener model? Drop me a line! I’m always happy to help fellow garage door enthusiasts solve their DIY challenges. And if you found this guide helpful, be sure to check out our other garage door maintenance and repair articles here at Garage Door Club.
About the Author:
Garth has been helping homeowners with garage door solutions since 2018, combining years of experience in digital content creation for reputable garage door repair companies with a passion for DIY education. His expertise covers everything from basic maintenance to complex troubleshooting, always with a focus on safety and practical solutions.